
Learning how to paddle a kayak properly for beginners is much easier when you focus on smooth movement instead of raw strength. A kayak paddle is not meant to be pulled like a heavy oar. Your torso, back, and legs help create the force while your arms guide the paddle. This approach can make each stroke feel lighter and help you stay in control.
The first few minutes on the water can feel awkward. The kayak may turn a little, your paddle may splash, and your arms may tire fast. That is normal. The goal is to build a simple stroke that feels balanced, repeatable, and easy to correct.
For a first lesson, calm flat water is the best place to practice. The American Canoe Association includes forward paddling, stopping, reverse paddling, sweep turns, launching, landing, and basic rescue skills in its introductory kayaking skill framework. Its beginner safety program also stresses trip planning, hazard awareness, weather, and rescue knowledge. :contentReference[oaicite:0]{index=0}
This guide explains how to paddle a kayak properly for beginners from the first grip to the basic strokes you need on a simple day trip. It also covers common mistakes, efficient body movement, turning, stopping, safety, and a practice plan you can use on your next outing.
Start With the Right Kayak Paddle and Basic Gear
Before learning how to paddle a kayak properly for beginners, make sure your basic gear fits the task. A recreational kayak, a suitable double-bladed paddle, and a properly fitted life jacket are the main pieces for a simple flatwater outing. Your paddle should feel light enough to control without forcing your shoulders or wrists into awkward positions.
Your kayak also needs to fit your body and the water you plan to use. A wide recreational kayak often feels stable for a first outing, while longer touring kayaks are made for different types of travel. Do not choose a kayak only because it looks fast or advanced.
A U.S. National Park Service safety guide advises paddlers to wear a U.S. Coast Guard-approved life jacket and keep it on while boating. It also notes that a life jacket should fit snugly, remain in place when you raise your arms, and be in good condition. Check local and state rules too, because requirements can vary by location. :contentReference[oaicite:1]{index=1}
- ✦ Kayak
Choose a kayak that matches your body size, skill level, and intended water. For a first lesson, calm lakes, protected bays, and slow water are usually easier to manage than open or fast-moving water.
- ✦ Paddle
Use a double-bladed kayak paddle that fits your kayak and body. The right length depends on factors such as kayak width, your height, and your paddling style.
- ✦ Life jacket
Wear a properly fitted, U.S. Coast Guard-approved life jacket whenever required and as a basic safety habit on the water.
- ✦ Whistle
A whistle can help you attract attention if you need help. Keep it easy to reach rather than buried inside a dry bag.
- ✦ Water and sun protection
Bring enough drinking water and protect your skin and eyes from the sun. Reflection from water can increase sun exposure.
Check Your Paddle Blade Position
Many kayak paddles have curved blades. The scooped or concave side is normally the power face, which faces the paddler. If the blades are offset, the paddle may also have a feather angle between the two blades. Beginners can find an unfeathered setup easier to understand because both blades sit at the same angle.
Hold the paddle in front of you and look at the blade shape before you start. Your large knuckles should generally line up with the top edge of the blade when your grip is set correctly. These simple checks can prevent a surprisingly common beginner mistake: trying to paddle with the blade facing the wrong way. :contentReference[oaicite:2]{index=2}
Use a Relaxed Grip
Do not squeeze the paddle as if you are trying to hold onto a heavy tool. Make a loose ring with your thumb and index finger, then let the other fingers rest around the shaft. A relaxed grip helps reduce hand and forearm fatigue.
A good rule is to hold the paddle firmly enough to control it but loosely enough that your wrists and fingers stay relaxed. If your forearms burn after only a few minutes, check your grip before assuming you need more strength. :contentReference[oaicite:3]{index=3}
Get Your Kayak Sitting Position Right
Good paddling starts before the first stroke. Sit with your back comfortably upright and your hips centered in the seat. Your feet should rest against the foot braces or foot area without forcing your knees into a locked position.
You want enough contact with the kayak to feel stable without becoming stiff. Your feet, legs, hips, and torso should work together. Think of your body as a connected system rather than two arms pulling on a paddle.
A common beginner mistake is leaning far back and then trying to move the kayak with the arms alone. That position can limit torso rotation and make the stroke feel weak. Sit tall, keep your shoulders relaxed, and allow your upper body to turn from side to side.

- ✦ Sit tall
Keep your spine naturally upright rather than slouching or leaning far back. A tall posture gives your torso room to rotate.
- ✦ Center your weight
Keep your hips centered in the kayak. Avoid leaning hard to one side unless you are intentionally practicing a specific maneuver.
- ✦ Use your feet
Let your feet and legs provide support as your torso rotates. Light pressure against the foot braces can help connect your lower body to the stroke.
- ✦ Relax your shoulders
Keep your shoulders down and loose. Raised shoulders often signal that you are using too much arm and neck tension.
Build the Paddler’s Box
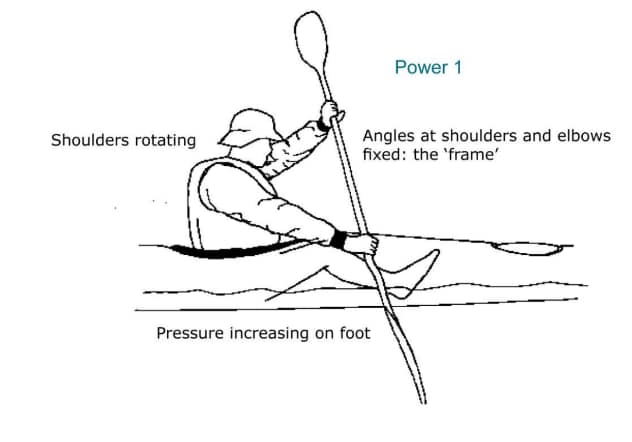
The paddler’s box is a simple way to picture good upper-body form. Your arms, paddle shaft, and chest form a rough box in front of you. Keep that structure stable while your torso rotates from side to side.
Your elbows should stay comfortably bent rather than locked. When you rotate your body, one hand pushes while the other hand helps guide and pull. This keeps the movement connected instead of making the lower arm do all the work.
Learn the Forward Stroke Step by Step
The forward stroke is the most important skill when learning how to paddle a kayak properly for beginners. You will use it more than any other stroke on a normal flatwater trip. A clean forward stroke should move the kayak ahead with little wasted motion.
Think of the stroke as three main phases: catch, power, and release. The catch places the blade in the water, the power phase moves the kayak, and the release ends the stroke so you can switch sides. This simple pattern makes the technique much easier to learn.
A useful mental cue is **plant, rotate, release**. Plant the blade near your feet, rotate your torso as the blade travels along the kayak, then release near your hip. The goal is not to pull the blade as far behind you as possible.
- ✦ 1. Rotate before the catch
Turn your torso toward the side where you will place the blade. Reach with your body, not only with your arms.
- ✦ 2. Place the blade near your feet
Put the blade fully into the water close to the kayak. A clean catch gives the blade a solid connection with the water.
- ✦ 3. Rotate through the stroke
Turn your torso back as the blade travels beside the kayak. Let your larger back and core muscles help create the movement.
- ✦ 4. Push with the upper hand
Think of the upper hand as pushing the paddle forward while the lower side helps guide the blade. This makes the stroke more balanced.
- ✦ 5. Release near the hip
Take the blade out when it reaches around your hip area. Pulling far behind the hip can waste energy and make the kayak less efficient.
- ✦ 6. Repeat on the other side
Bring the opposite blade forward and repeat the same sequence. Keep the rhythm smooth rather than rushing between strokes.
The Catch
The catch is the moment when the blade enters the water. Start by rotating your torso and reaching forward with the blade near your feet. Try to place the blade fully into the water before applying strong pressure.
Avoid stabbing the blade into the water with a hard downward motion. A smooth entry creates less splash and helps you keep the kayak stable. The catch should feel like placing the blade into a firm surface.
The Power Phase
Once the blade is planted, rotate your torso as the blade moves toward your hip. Your arms should guide the paddle while your torso does much of the work. Keep the blade fairly close to the kayak so its force helps drive the boat forward.
Try not to think about pulling the kayak with your lower arm. Instead, imagine moving the paddle past your body while your torso unwinds. This cue often makes the stroke feel smoother and reduces the urge to tense your arms.
The Release
Release the blade around your hip instead of dragging it far behind you. A clean release lets you move quickly into the next catch. It also helps keep the blade from lifting water and wasting effort.
The transition should be quiet and relaxed. If you hear a large splash after every stroke, slow down and work on a cleaner release.
Use Your Core Instead of Just Your Arms
One of the biggest lessons in how to paddle a kayak properly for beginners is learning where the power should come from. Your arms are important, but they should not carry the entire workload. Torso rotation lets you use larger muscle groups in your back and trunk.
Imagine your upper body turning like a slow windshield wiper. When you plant the blade on the right, your torso is rotated toward the right. As the blade moves back, your torso rotates toward the left and prepares the next stroke.
This movement does not need to be dramatic. Beginners often try to twist as far as possible and become stiff. A small, comfortable rotation repeated with good timing is more useful than a huge rotation that causes strain.
- ✦ Use your torso
Let your torso rotate into and out of each stroke. This reduces the need to pull hard with your arms.
- ✦ Keep your elbows safe
Avoid locking your elbows straight or forcing them into extreme positions. Comfortable bends give you room to control the paddle.
- ✦ Relax your hands
A loose grip makes it easier to rotate the paddle and reduces tension in your wrists and forearms.
- ✦ Use steady pressure
Apply pressure smoothly rather than making a sudden hard pull. Smooth force usually gives you better control.
A Simple Body Cue
Try this cue: **belly button follows the paddle**. When the blade goes into the water on your right, let your torso turn right. When the blade moves back, let your torso turn left and prepare for the next side.
This cue can feel more natural than thinking about separate arm movements. It also helps you keep the stroke connected to your body instead of treating the paddle like an isolated tool.
Learn How to Keep a Kayak Going Straight
New paddlers often ask why the kayak keeps turning when they are trying to go straight. The reason is simple: each paddle stroke applies force to one side of the boat. If the strokes are uneven, the kayak responds by changing direction.
You do not need to make every stroke perfectly identical. Instead, focus on keeping the blade path close to the kayak, switching sides at a steady rhythm, and avoiding very deep strokes behind your body.
If your kayak has a rudder or skeg, learning basic control without depending on it can be useful during early practice. Beginner instruction from REI also recommends practicing basic strokes in a calm setting and learning to track and turn through paddle technique. :contentReference[oaicite:4]{index=4}
- ✦ Use similar stroke lengths
Try to make the right and left strokes similar in length and power. Large differences can make the kayak wander.
- ✦ Keep the blade near the hull
A blade that travels far away from the kayak can create more turning force. A closer path is usually better for straight travel.
- ✦ Look ahead
Keep your eyes on where you want to go rather than staring at the paddle. Your body often follows your visual focus.
- ✦ Slow down when correcting
If the kayak starts to wander, do not panic and make huge strokes. Small corrections are easier to control.
Why Beginners Often Zigzag
Zigzagging often happens because one side is stronger than the other. It can also happen when a beginner reaches too far forward, pulls too far back, or uses a different paddle angle on each side.
The fix is usually not more power. Slow down and make each stroke smaller. Once the kayak begins to track well, add power while keeping the same basic form.
Learn the Sweep Stroke for Turning
The sweep stroke is one of the most useful skills after the forward stroke. It helps you turn the kayak without stopping first. The basic idea is to make a wide arc with the paddle on one side of the boat.
To turn left, a right-side sweep can help move the bow toward the left. To turn right, a left-side sweep can help move the bow toward the right. The exact amount of turning depends on the kayak, water, stroke shape, and speed.
A sweep begins farther forward than a normal corrective stroke and travels in a wider arc. Rotate your torso with the blade and keep the movement smooth. Avoid using only your arms to force the boat around.
- ✦ Reach forward
Rotate toward the side where you will sweep and place the blade near the front of the kayak.
- ✦ Make a wide arc
Move the blade away from the kayak in a broad curve toward the stern. The wider path creates more turning force.
- ✦ Rotate your torso
Follow the paddle with your upper body. This gives the stroke more control and keeps your arms from doing all the work.
- ✦ Release cleanly
Take the blade out when it reaches the area behind the cockpit rather than forcing it through a long, awkward pull.
A Simple Turning Drill
Start on calm water with plenty of open space. Paddle forward for a few strokes, then stop applying forward strokes and use one wide sweep on the right side. Watch how the bow responds.
Repeat on the left. Once you understand the response, try one sweep followed by two normal forward strokes. This teaches you how to combine turning and forward movement instead of treating each stroke as a separate skill.
Learn the Reverse Stroke and How to Stop
Knowing how to move forward is only half of basic kayak control. You also need to slow down and stop. The reverse stroke is the basic tool for both braking and moving backward.
The reverse stroke works like a forward stroke in the opposite direction. Start with the blade near your hip, place it in the water, and push the blade toward your feet while rotating your torso.
If you are moving quickly, use several controlled reverse strokes rather than trying to stop with one huge stroke. Learning to slow down early gives you more time to avoid docks, rocks, boats, and other obstacles.
- ✦ Look before braking
Know what is behind you before moving backward. Turn your head and use your surroundings instead of relying only on the feel of the kayak.
- ✦ Start gently
Use controlled reverse strokes first. You can add pressure once you understand how quickly your kayak responds.
- ✦ Keep your body centered
Do not lean far backward to create more force. Stay balanced and let the paddle do the work.
- ✦ Practice stopping
On calm water, paddle at an easy speed and then practice stopping within a short distance. Repeat until the movement feels automatic.
Use the Draw Stroke to Move Sideways
The draw stroke lets you move the kayak sideways. This is useful when approaching a dock, moving beside another kayak, or making a small position change without turning the entire boat.
Reach the paddle out to the side and place the blade in the water. Pull the blade toward the kayak while keeping the blade submerged, then take it out before it hits the hull.
The movement is easier when your torso rotates toward the paddle. Do not pry against the side of the kayak if the blade touches the hull. REI specifically advises relaxing or releasing the top hand instead of forcing the blade free, since prying can create a tipping risk. :contentReference[oaicite:5]{index=5}
- ✦ Reach sideways
Place the blade in the water a short distance away from the kayak rather than directly against the hull.
- ✦ Pull toward the boat
Use a controlled sideways pull to bring the kayak toward the blade.
- ✦ Stop before contact
Take the blade out before it reaches the kayak. Reset the paddle and repeat if you need another draw.
Avoid These Common Beginner Kayaking Mistakes
Understanding how to paddle a kayak properly for beginners also means knowing what not to do. Many early problems come from using too much force, poor posture, or trying to learn advanced moves before basic control feels natural.
The good news is that most mistakes are easy to fix. Slow down, reduce the size of your stroke, and pay attention to how the kayak responds. Good technique usually develops from many calm repetitions rather than a few powerful strokes.
- ✦ Using only the arms
If your arms are doing nearly all the work, your torso may not be rotating enough. Sit tall and let your upper body turn with each stroke.
- ✦ Gripping too hard
A tight grip can make your hands and forearms tired quickly. Keep your fingers relaxed while maintaining enough control.
- ✦ Pulling behind the hip
A very long stroke can waste energy and disturb your kayak’s balance. Release near the hip and begin the next stroke.
- ✦ Making huge strokes
Large strokes can create unwanted turns and splashes. Use smaller strokes until you have better control.
- ✦ Looking down at the paddle
Watching every blade entry can make it harder to maintain direction. Look ahead and use your peripheral vision to monitor the paddle.
- ✦ Ignoring wind
Wind can move a kayak even when your strokes are good. Learn to notice wind direction before you travel far from your launch point.
- ✦ Going too far too soon
A beginner should build skill before attempting long trips or difficult water. Stay within conditions that match your training and experience.
The Arm-Only Trap
The arm-only stroke is one of the most common problems for new paddlers. It feels natural because the hands are holding the paddle, but the arms are not the only muscles available to you.
Try making the next ten strokes smaller and slower while focusing on torso rotation. If your arms feel less tired and the kayak still moves well, you have found a more efficient movement pattern.
The Splashing Trap
A little splash is normal. Constant loud splashing can mean that the blade is entering at the wrong angle, the stroke is too aggressive, or the paddle is being lifted out too quickly.
Practice quiet strokes on calm water. Try to make the blade enter cleanly and leave cleanly. Quiet paddling is not the goal by itself, but it can be a useful sign that your movements are becoming smoother.
Practice How to Paddle a Kayak Properly for Beginners With Simple Drills
Practice works best when you focus on one skill at a time. You do not need a long training session to improve. Even a short session on calm water can help if each drill has a clear goal.
For your first few outings, spend more time on basic control than on distance. The American Canoe Association’s introductory kayaking framework includes forward paddling, reverse paddling, stopping, turning, sideways movement, launching, landing, and basic rescue skills. That mix gives beginners a useful picture of what basic kayak competence involves. :contentReference[oaicite:6]{index=6}
- ✦ Drill 1: Ten slow forward strokes
Take ten slow strokes while focusing on torso rotation and a relaxed grip. Stop and check how your hands, shoulders, and back feel.
- ✦ Drill 2: Straight-line challenge
Choose a safe point ahead and paddle toward it without using a rudder if conditions allow. Focus on even strokes rather than speed.
- ✦ Drill 3: Stop and go
Paddle forward for several strokes, then use controlled reverse strokes to stop. Repeat several times at an easy speed.
- ✦ Drill 4: Wide turns
Practice a right sweep and a left sweep in open water. Learn how much the kayak turns after one stroke.
- ✦ Drill 5: Sideways movement
Practice a few draw strokes on each side. Keep the kayak stable and stop before the blade touches the hull.
- ✦ Drill 6: Paddle with less effort
Paddle at a comfortable speed while deliberately reducing your arm effort. Try to keep the kayak moving with torso rotation and smooth blade placement.
A Simple 30-Minute Beginner Session
Spend the first five minutes getting comfortable with the kayak, paddle, and water. Then spend ten minutes on the forward stroke. Use the next five minutes for stopping and reverse strokes, followed by five minutes of sweep turns.
Use the final five minutes to paddle slowly and notice what feels different. If your shoulders are tight or your hands hurt, adjust your grip and posture before your next session. The goal is to finish with better control, not simply a higher distance.
Stay Safe While Learning to Kayak
Learning how to paddle a kayak properly for beginners is only part of being ready for the water. A strong stroke cannot make unsafe conditions safe. Beginners should choose water that matches their skill and should understand wind, current, temperature, boat traffic, and weather before launching.
The National Park Service recommends checking conditions, staying within your skill level, using the buddy system, and telling someone where you are going and when you expect to return. Its kayaking guidance also stresses that conditions can change quickly and that paddlers should have appropriate equipment for the environment. :contentReference[oaicite:7]{index=7}
Cold water deserves special attention. Even when the air feels warm, cold water can quickly reduce your ability to swim and control your body. Wear clothing suited to the water temperature, not just the air temperature, and learn what to do if you capsize.
For more structured learning, consider an introductory class with a qualified paddling instructor. The American Canoe Association offers beginner-focused safety education and Level 1 kayaking instruction that covers basic equipment, paddler mechanics, forward and reverse strokes, turning, bracing, and related skills. :contentReference[oaicite:8]{index=8}
- ✦ Wear your life jacket
Keep a properly fitted, approved life jacket on while paddling. Carrying one nearby is not the same as wearing it.
- ✦ Check the forecast
Look at wind, storms, temperature, and other conditions before you launch. Conditions can change after you leave shore.
- ✦ Tell someone your plan
Share your route and expected return time with someone who is not on the trip. Update them when you return.
- ✦ Paddle with others
A buddy can provide help if you capsize, become tired, or face a problem on the water.
- ✦ Stay within your skill level
Avoid strong currents, rough surf, open-water crossings, and other demanding conditions until you have suitable training and experience.
- ✦ Know your local rules
Check state, local, park, and waterway requirements before launching. Rules and equipment requirements can vary.
- ✦ Practice a capsize plan
Learn how to wet-exit and recover your kayak in an appropriate setting. Formal instruction is especially useful for learning rescue skills.
Choose Calm Water for Your First Lessons
Calm water gives you time to think. A quiet lake or protected area can let you focus on grip, posture, forward strokes, turns, and stopping without fighting strong wind or waves.
Do not confuse calm-looking water with guaranteed safety. Check the forecast, water temperature, boat traffic, access points, and local hazards before launching. Some waterways can become difficult even when the surface looks smooth from shore.
Understand When Not to Launch
Sometimes the safest paddling decision is to stay on shore. Strong wind, thunderstorms, high waves, fast current, cold water, heavy boat traffic, or unfamiliar conditions can quickly exceed beginner skills.
The National Park Service advises paddlers not to exceed their skill level and to evaluate weather and water conditions before entering challenging environments. When conditions do not match your experience, postpone the trip or choose a more protected location. :contentReference[oaicite:9]{index=9}
How to Paddle a Kayak Properly for Beginners in Wind and Current
Wind and current change the way a kayak behaves. You may paddle with good form and still see the boat move sideways or turn. That does not always mean your technique is wrong.
The first skill is awareness. Before leaving shore, look at the direction of the wind, the movement of the water, and your planned route. Think about how difficult it will be to return to your launch point, not only how easy it will be to travel away from it.
The National Park Service warns that paddlers should pay attention to wind, waves, and currents and should plan routes with conditions in mind. It also recommends avoiding situations that exceed your skill level. :contentReference[oaicite:10]{index=10}
- ✦ Start into the wind when appropriate
If conditions are mild and safe, consider how you will return before committing to a route. Do not travel farther than you can comfortably paddle back.
- ✦ Expect correction strokes
Wind may push your bow or stern off course. Small sweep or corrective strokes can help you maintain direction.
- ✦ Respect current
Moving water can carry a kayak faster than a beginner expects. Learn about the waterway before paddling near rivers, inlets, or tidal areas.
- ✦ Turn back early
If conditions become harder than expected, return while you still have plenty of energy and control.
How to Make Your Kayak Paddling More Efficient
Once you understand how to paddle a kayak properly for beginners, efficiency becomes the next goal. Efficiency does not mean paddling as hard or as fast as possible. It means getting useful movement from each stroke while keeping your body relaxed.
Watch for signs of wasted effort. If your paddle creates lots of spray but the kayak barely moves, if your shoulders rise toward your ears, or if your hands become numb, stop and reset. A slower stroke with better form often beats a hard stroke with poor form.
Experienced paddlers still work on their forward stroke because small changes in timing, blade placement, posture, and body rotation can change how a kayak moves. Treat the forward stroke as a skill you keep refining rather than something you master after one lesson.
- ✦ Keep strokes smooth
Smooth strokes help maintain a steady rhythm and reduce sudden body tension.
- ✦ Avoid unnecessary splash
Clean blade entry and release can reduce wasted movement and help you maintain a stable rhythm.
- ✦ Use a comfortable cadence
Do not copy another paddler’s speed. Find a stroke rhythm that lets you breathe normally and maintain control.
- ✦ Relax between strokes
Do not hold constant tension in your shoulders and hands. Relax during the recovery phase before the next catch.
- ✦ Practice before chasing distance
Better technique should come before longer trips. Distance becomes easier when basic movement is efficient.
A Useful Efficiency Test
Paddle for a few minutes at an easy pace and notice how your body feels. Then reduce your arm effort while keeping the same general speed. If you can maintain movement with less strain, you are likely using your body more effectively.
Do not turn this into a contest. The purpose is to find a comfortable stroke that you can repeat for a long time. Good technique should feel sustainable, not exhausting.
A Beginner’s Step-by-Step Kayaking Checklist
If you want a simple answer to how to paddle a kayak properly for beginners, use a repeatable routine. Check your gear first, choose suitable water, settle into a balanced seat, and practice basic strokes before moving far from shore.
The checklist below is useful for a first outing. It keeps the focus on safety and control instead of speed or distance.
- ✦ Before launching
Check the kayak, paddle, life jacket, weather, water conditions, route, local rules, and communication plan.
- ✦ After entering the kayak
Center your hips, set your feet, sit tall, relax your shoulders, and confirm that your paddle orientation feels correct.
- ✦ Start slowly
Take short forward strokes and learn how the kayak responds before adding power.
- ✦ Find your rhythm
Rotate your torso, keep a relaxed grip, and release the blade around your hip.
- ✦ Practice control
Work on stopping, reverse strokes, sweep turns, and sideways movement before going farther.
- ✦ Monitor conditions
Keep checking wind, waves, current, weather, traffic, and your own energy level.
- ✦ Finish early if needed
Return while you still feel strong and comfortable. A short successful trip is better than pushing until you are exhausted.