
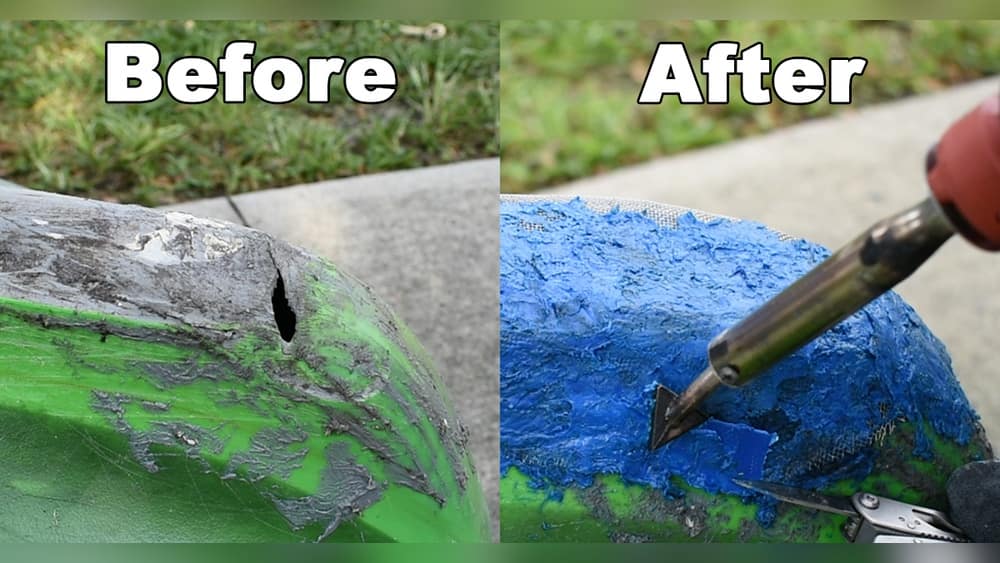
If you love kayaking, nothing is more frustrating than finding a crack in your kayak. A small crack might look harmless at first, but it can quickly get worse, letting water inside and making your trip less safe. Even experienced paddlers can feel nervous when they see damage, but you don’t need to be an expert to fix most cracks.
With the right tools, a little patience, and a clear guide, you can repair your kayak and get back on the water. This article will show you exactly how to fix a crack in a kayak, using easy-to-understand steps that work for both beginners and more experienced do-it-yourselfers.
Understanding Kayak Cracks
Before you start fixing, it’s important to know what kind of crack you’re dealing with. Most kayaks are made from rotomolded polyethylene plastic, though some are fiberglass or composite. Each material needs a slightly different approach.
- Hairline cracks: These are very thin and often caused by stress or aging.
- Split or open cracks: Larger and sometimes jagged, usually from hard impacts.
- Worn areas: Sometimes an area becomes thin before it cracks.
Not all cracks are the same. A hairline crack may not leak much, but it can grow over time. A split or jagged crack is more urgent and must be fixed before using the kayak again.
Why You Should Fix Cracks Quickly
A kayak with a crack is at risk of letting in water. This can make paddling harder, make the kayak unstable, or even cause it to sink. Also, cracks can spread, especially if you drag the kayak or store it in the sun.
Fixing the problem early keeps you safe and avoids bigger repairs later.
Tools And Materials You’ll Need
Having the right materials ready will make the repair smoother. Here’s what you’ll need for most polyethylene kayak repairs:
- Heat gun or propane torch
- Utility knife or razor blade
- Sandpaper (80 and 120 grit)
- Polyethylene welding rods (or scrap plastic from another kayak)
- Metal spoon or putty knife
- Clean rags and rubbing alcohol
- Gloves and eye protection
- Drill (optional, for stopping crack growth)
- Plastic-friendly epoxy (for some repairs)
- Marine-grade waterproof sealant (optional)
If you’re working with a fiberglass kayak, you’ll need:
- Fiberglass repair kit (cloth, resin, hardener)
- Mixing cup and stick
- Masking tape
- Scissors
- Sandpaper
Step-by-step: How To Fix A Crack In A Polyethylene Kayak
Polyethylene kayaks are the most common type today, especially for recreational and fishing use. Let’s walk through the process for these, since they need a special approach.
1. Assess The Damage
Start by cleaning the area around the crack. Dirt and sand can hide the full length of a crack. Use a flashlight to see if the crack goes all the way through. Gently press the area to check if the plastic flexes.
If you see a crack longer than a few inches, or if it’s near a seam, you might want to get professional help, but most cracks are fixable at home.
2. Stop The Crack From Spreading
For cracks longer than 1 inch (2.5 cm), use a small drill bit to make a tiny hole (about 1/8 inch or 3 mm) at each end of the crack. This is called “stop-drilling.” It prevents the crack from growing further.
3. Prepare The Area
Lightly sand the area around the crack, about 1-2 inches (2.5-5 cm) out from the damage, using 80 grit sandpaper. This roughens the surface and helps the plastic bond. Wipe the area with rubbing alcohol and let it dry.
4. Cut And Shape The Crack
Use a sharp utility knife to carefully “V” out the crack. This means making a small groove along the crack, wide enough to hold melted plastic. This step helps the new plastic bond deeply, not just on the surface.
5. Heat The Area
Using a heat gun (set to medium) or a propane torch (on low), gently warm the area around the crack. Do not hold the heat in one spot, or the plastic could burn. The goal is to make the plastic soft and ready for welding.
6. Plastic Welding
Take a polyethylene welding rod or a strip cut from a similar kayak. Heat the end of the rod and the crack together, then press the softened plastic into the groove. Use a metal spoon or putty knife (also warmed) to smooth and press the melted plastic firmly into the crack.
Work in small sections. Allow each part to cool slightly before moving on. You want the repair to be even with the kayak’s surface.
7. Finish And Test
Once the area is cool, sand it lightly with 120 grit sandpaper to smooth any rough edges. Check that the repair is flush with the surrounding plastic. If you want extra protection, apply a marine-grade sealant over the repair.
To test, fill the kayak with a little water and see if there are leaks. If it leaks, repeat the welding step.

Credit: forums.paddling.com
Repairing Cracks In Fiberglass Kayaks
Fiberglass kayaks need a different repair method. Here’s how to do it:
- Clean and sand the area around the crack, removing any loose fibers or paint.
- If the crack goes all the way through, sand both the inside and outside of the kayak.
- Cut pieces of fiberglass cloth to fit over the crack, with each layer slightly larger than the last.
- Mix the resin and hardener according to instructions.
- Tape the area around the crack to prevent drips.
- Apply a thin layer of resin, lay down the smallest piece of cloth, and saturate it with resin. Repeat with larger pieces.
- Let the patch cure fully (usually overnight).
- Sand the area smooth and paint if desired.
Choosing Between Diy And Professional Repairs
Not all cracks are safe to fix at home. Here’s how to decide:
| Crack Size | DIY Repair? | Professional Needed? |
|---|---|---|
| Less than 3 inches | Yes | No |
| 3-10 inches | Yes, with caution | Maybe |
| Over 10 inches | No | Yes |
| Near seam or structural part | No | Yes |
If you are ever unsure, it’s safer to ask a kayak shop or manufacturer before attempting a big repair.
Common Mistakes When Repairing Kayak Cracks
Even experienced DIYers make errors. Here are some to avoid:
- Using the wrong plastic: Not all plastics bond. Only use polyethylene for polyethylene kayaks.
- Overheating the area: Too much heat can warp or burn the kayak.
- Skipping surface prep: Not sanding or cleaning means the repair may not hold.
- Not stop-drilling: Cracks can return if you don’t drill small holes at the ends.
- Ignoring safety: Always wear gloves and eye protection, especially when working with resins or heat.
Tips For A Stronger, Longer-lasting Repair
Some tricks help make your repair last longer:
- Always work in a well-ventilated area to avoid fumes.
- Use thin layers of plastic rather than one thick piece. They cool better and bond deeper.
- Let the repair cure for at least 24 hours before using the kayak.
- If possible, reinforce the repair from inside the kayak for extra strength.
- Store your kayak out of the sun after repairing, as UV light can weaken plastic welds.

Credit: www.youtube.com
When To Replace Instead Of Repair
A kayak with many cracks, or one with a crack over a foot long, may not be safe even after repair. If the plastic is very thin, soft, or has become brittle, replacement is smarter. The same goes for kayaks that have lost their shape or have damage near the seat or cockpit.
According to data from the American Canoe Association, about 8% of kayak accidents involve equipment failure—mostly from poorly repaired hulls. Don’t risk your safety; if in doubt, get a new kayak.
How To Prevent Cracks In The Future
You can avoid most cracks by handling your kayak with care:
- Always lift, don’t drag, your kayak—especially on rough surfaces.
- Store your kayak out of direct sunlight to prevent plastic from getting brittle.
- Check your kayak for damage after each trip and fix small cracks early.
- Use proper kayak racks for transport. Tight straps or sharp edges on roof racks can cause cracks.
- Don’t overload your kayak. Stick to the manufacturer’s weight guidelines.
A little prevention saves a lot of repair work later.
Cost Comparison: Diy Vs Professional Repair
Wondering if it’s worth fixing a crack yourself? Here’s a quick look at typical costs:
| Repair Type | DIY Cost | Professional Cost |
|---|---|---|
| Small Crack (Plastic) | $20-$40 | $80-$150 |
| Large Crack (Plastic) | $40-$70 | $150-$300 |
| Fiberglass Repair | $35-$60 | $120-$250 |
DIY repairs are much cheaper, but only make sense for small to medium cracks. Remember, a failed repair can cost more to fix later.
Example: Real-world Kayak Repair
Imagine you find a 2-inch crack near the middle of your polyethylene kayak after scraping over rocks. Here’s what you do:
- Clean and sand the area.
- Drill small stop-holes at each end.
- Cut a V-groove into the crack.
- Heat the area with a heat gun.
- Melt and spread a strip of polyethylene rod into the groove.
- Smooth with a warm spoon.
- Let cool, then sand smooth.
- Test for leaks.
After this, your kayak should be almost as strong as before. Many paddlers have used this method to repair kayaks that lasted for years afterward.
Extra Insight: The Role Of Plastic Types
One thing beginners often miss: not all plastics are the same. Most kayaks are made from high-density polyethylene (HDPE), which is tough and flexible. Some cheaper kayaks use linear polyethylene, which is less strong. Using the wrong repair plastic will cause the patch to fail quickly. Always check your kayak’s material before buying repair rods.
Also, some plastic kayaks have a UV-resistant layer or special coatings. If you sand through this, the area may become weaker over time. For best results, try to keep sanding to a minimum and reseal the area with a UV protectant spray after repair.
Frequently Asked Questions
How Do I Know If My Kayak Crack Is Serious?
If the crack is longer than 6 inches, near a seam, or you can see daylight through it, it’s serious. If water leaks in quickly, do not use the kayak until repaired.
Can I Use Glue Or Regular Epoxy To Fix A Plastic Kayak?
Most household glues and epoxies do not bond well with polyethylene. For best results, use plastic welding or a marine-grade, plastic-compatible epoxy.
Is It Safe To Use A Heat Gun On My Kayak?
Yes, if you use it with care. Keep the heat moving and never hold it in one spot for more than a few seconds. Overheating can warp or burn the plastic.
How Long Does A Typical Kayak Repair Last?
A well-done repair can last for years, sometimes even for the rest of the kayak’s life. The key is careful prep and using the right materials.
Where Can I Buy Plastic Welding Rods For Kayak Repair?
Most outdoor stores, kayak shops, or online retailers sell polyethylene welding rods. Make sure to get the right type for your kayak. For more details, see this guide from Advantage Kayak.
Kayak cracks can feel like a big problem, but with the right approach, you can repair most damage at home. Take your time, follow the steps, and your kayak will be ready for new adventures on the water. Safe paddling!
Credit: www.reddit.com